Pages

Tuesday, December 14, 2010

A Creative Odyssey:)

Image from here :)

Today I am participating in the Creative Odyssey blog hop run by the lovely Jess Van Den:)  Today is day 9 of the blog hop and my turn to share my creative odyssey for 2011. You can catch up on the line up here or check out the other participant from today quiet paws:)

This year I followed the advice of the image above by Leah Rosenberg:) I embraced my inner granny. I practised my crochet. I painted my floor boards white. I learnt a little more about myself and the fact that I can just enjoy what I am doing without worrying about what other people think of my granny activities:)

My creative odyssey for 2011 stems from my need to streamline:) Next year I plan to creatively streamline my craft room so I can use the space more effectively! My odyssey involves using my lovely fabric stash and all the lovely bits and pieces I have stored all over house!:) At the end of this week I start 6 weeks of holidays and I can't wait to start my mission:) I want to use what I have rather than buy new fabrics for every new task. I want to make sure I am using up all my scraps and not wasting anything!

I plan to make lots of beautiful things for my family, friends and my etsy store:) Right now I have so many ideas and just no time to make them all! So next year I want to make the time and the space (in my craftroom, not on the couch) to take advantage of the opportunities I have to create beautiful things.

I also want to build things! Especially this....


Image from here:)

I love building furniture and this is my creative making goal for the year:)

I hope you have enjoyed hearing a few of my creative odyssey ideas for 2011, make sure you check in with the other bloggers following the Creative Odyssey blog hop:)

Monday, November 8, 2010

How to grow yourself a new collection:)

Sometimes things are looking a little shabby in the old succulent department... These little bubbies haven't really been well loved in sometime... sitting under the eaves with no water and a lot of sun... mistake! They have become a little misformed and somewhat crispy!
So this is the perfect occasion to do some succulent maintainence... Now I must tell you, this is the way I've been doing this for nearly 2 years, so it may not be the most effective way but it is my way...
So first you need the things above -
- Succulent and cacti potting mix (this gives the best result... although i have used normal potting mix and at one point even straight compost...)
- Somewhat overgrown succulents
-Scissors
- Seed raising tray (Not always essential I guess... but I think it helps the process a bit)
The seed raising tray below is one of mine... it is a bunnings one... my friend got similar at aldi for 1/3 of the price so if you see them there snap up a couple! I have another one but it's just not as pretty... also from bunnings..


First step is to fill the little holes with the potting mix, usually nearly all the way up to the top!


Then find some weird looking succulents that need some maintainence...

This first one is not so weird, it just has some extra babies hanging off its side... Perfect! 


This next one went weird and long... trim that back... will see what happens there... haven't ever cut the main stem off before.. usually I would take that extra little bubby one out of the middle...


This one also had long bits... and a flower coming! But the flower needs to be removed if the succulent is going to grow more successfully this season! Also I did some pruning...
  

Found this little selection on the footpath after someone tore it off a bush.


Next step is to snip off the babies and pruning bits so there is a little bit to stick in the dirt:) Luckily these ones have little roots as well.  They could have probably just have gone straight in a pot with the root system, but they are very tiny for a pot!
(At this point better homes and gardens man would have left them in the sun to form a callous on the cut so they don't rot.. but i have never done this.. not sure how much more successful it would be..)


Then just pop them in the dirt!


Then after maintaining a couple of plants you will end up with a little tray of loveliness like this:) I have two trays of lovelies right now! And in about 6 weeks they will be ready for planting in pots or you could pop them in the garden... or whatever!:)


Goodluck with your future succulent garden collection!

Sunday, November 7, 2010

We've been feeling a litttttle under the weather....

I have been absent from my blog... my sister reminded me... apparently she is no longer interested in my paint work lesson?

May be these will explain something? Our little Suki-La has been a little under the weather! She went to the special bunny vet and they were very very excellent! But unfortunately the antibiotics she was given didn't agree with her and she stopped eating or drinking:( Resulting in a number of vet visits, a cage to go in when in the car, force feeding every two hours and a day in bunny hospital!

Poor bunny! No wonder she felt like this ....


And then just as she was starting to feel a little more like this.....


She had to go back to the vet again to sort out her first issue! The sneezing! So she had to have her tear ducts flushed with antibiotics.... it made her very unhappy:(

Although now just to ease all your minds, the lovely Suki-La is feeling much better and is fine with getting cold antibiotic drops in her eyes twice a day, especially when broccoli follows! She is also enjoying her new delicious green diet:)

Super cute.

Suki sends her love and kisses:)

Wednesday, October 6, 2010

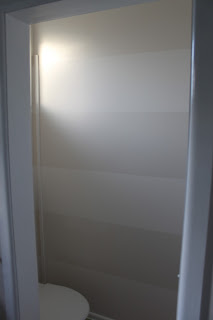
Painting stripes in the toilet:) You can too!:)

You might like to have a look at my before toilet in the last post... ew. At one stage when we first moved in I preferred public toilets to my own... that is pretty bad right??

In an effort to remedy this earlier this winter I did one layer of the Antique White USA from Dulux in the toilet. I also did two layers of ceiling white. I then ran out of paint..

Of course it was a little boring... and I see so many nice blogs and images online with more exciting paint jobs... So I decided on stripes. But subtle stripes. It is a rental after all!

At this point I had already removed the less attractive gloss royal blue plastic toilet roll holder... just didn't think it would go with my super awesome paint look.


 I also remembered the important things like - putty up the toilet roll holder holes before embarking on the epic paint spree.


I then did the second coat of the Antique White all over the walls - except the wet putty and left it over night to really dry well.
 In the morning I started taping and fixed up the toilet roll holder putty:) This was so the Antique White could dry properly before I put tape on it! I started taping with a level and a metre long ruler, but I found that the ruler alone was enough:) Also I started on a mini wall section that seemed less daunting than the longer wall section. I measured at both the beginnings, ends and at many points in between to get the tape straight.

I measured two rows at a time for speed and accuracy... My wall took 5 taped lines - 4 Antique white and 3 contrast.

 I wanted a super subtle effect - very non-offensive but still nice and interesting. I also wanted to reflect the beachy kind of simple aesthetic - we are in a 40 year old beach holiday house so gotta go with that... nothing super fancy!

My original ideas were either and gloss and matte paint contrast or two shades in the original Antique White USA that is all over the house.
But then why introduce new colours? And then I got to why introduce a new can of paint? So I ended up using ceiling white stripes.. I have excess ceiling white why not use it? And with my ceiling white it seems to be not fully opaque so it was perfect, especially with the future gloss white frame work.

I started at the bottom with a ceiling white line because I didn't want the ceiling white stripe touching the ceiling white roof... I used a roller, an edger and a brush to make sure I got into all the corners. I also kept a wet cloth handy to clean up any accidents over the tape lines.


I left the first coat to dry and then went over it with a second coat which fixed up most missed bits. There are still a few but we can go back and fix those up later!

I remember reading somewhere that after using the tape you should pull it off the wall before the paint dries? So I did that after the second coat.

I then gave all the trims a double coat in a gloss white to finish off:)


I left attaching the toilet roll holder until the next day because I  wanted to give the ceiling white paint enough time to dry properly. It was a little IKEA holder (Lillholmen range $9.99), I needed a stainless steel look and a hangy one so no one gets stabbed by the toilet roll holder while at the toilet!
So excitedly my whole toilet renovation cost a grand total of about $14! Tape and the holder! Everything else I already had:)  The whole process took about 4 hours of actual work but happened over 48 hours to get the drying time in for a better finish:)


What do you think? Have you done any bargain renovations lately?

Tuesday, October 5, 2010

Renovation update!

What is this? Obviously it is my house... you can see my glass jar with the laundry powder... must be the laundry! Also you may notice I have been to IKEA... I need to go again. I need to get baskets for the top shelf...

But of course you may be more familiar with this look... the ghetto look of my house...


As you can see, things had to change. Dishwasher in the laundry is only the start of the ickiness! The lino was not my favourite floor surface either:) Neither was the unusual scent coming from the lino behind the toilet... But then after my father in law sorted out the lino and the strange scent, and then this lovely lady turned up! 


The lovely Miss Luey. She is a tiling god. look at those skillz. I know she looks like she is going to the toilet.. she is not. She is just using the environment to enhance her tiling skills! And on her 1 day off of the WHOLE week!


Look... there it goes... a little tiling path...:) Its finished now... but I don't have a picture of that...
Soon I can show you how I painted the toilet! I know.. exciting... but its stripes! Its very lovely:)

Saturday, October 2, 2010

When a girl has too much fabric...

Who ever knew that could happen??
I have a fair stash, but currently my craft tables are hidden under a mountain of little bits of fabric! Still too big/useful to discard, I use them to make one of my favourite things. Mini bunting. Currently we have no mini bunting up. It is a self imposed ban. I may have previously "over bunted" at my last home... we are taking a bunting break, which means more bunting for you!

Here are two sets I prepared earlier...


The first one is a cute cotton set which literally made me smile while I was ironing it, the second is a longer vintage kimono fabric bunting (it's actually from the obi...). it is all metallic and silvery good:) Both available in my etsy store... if I don't get confused are try to keep them... and  over bunt another house....

And they are my new laundry shelves... love a good floating shelf also:)  I got a bit excited and put my Able and Game post card and Pocket Carnival gift card framed in my laundry... everyone has framed images in their laundry right? right?

Thursday, September 23, 2010

Oooh nice treasuries!

This lovely treasury is by KitKat Creations.. see my little mustard booties? I love that colour:)

And this lovely one is by Fullspiral... mine is the green clutch.. super springy:)

Click on the images to have a look at the treasuries!

Tuesday, September 21, 2010

This is problematic...


So obviously this is a problem.... And due to the lack of wardrobe doors in the master bedroom this is what I get to look at when I wake up and go to sleep... Unfortunately our mini wardrobe does not allow for nice wooden coat hangers... they are tooooo bulky!

So I have been working on some of these....


I got the super cute pattern from here... dottie angel blog, one of my all time favourites! And of course when i realised they were called "happy hangers" I knew they would be perfect:)

So now I have a small section of this.....


And obviously that makes me a lot happier than the original! Now when I wake up in the morning and look at my happy hangers... ans it certainly makes me happy:) As does hanging up the washing... i know, you obviously need some too.

Monday, September 20, 2010

Oh I'm sorry did you say fresh?


Yes. Mega fresh! Straight from the mushroom growing box! They tasted just as delicious as they looked! YUM YUM! As it was not originally my mushroom growing box I am unsure of the suppy of mushrooms that will happen... but these were so delicious that if I never get to try anymore that will be ok too:)

My precious fur baby deserves gifts. Handmade gifts.

You've all met my beautiful bunny.... well she is fat. Too fat. She is looking at bit mangey as she is moulting and too fat to preen her own back. She doesn't reallllly enjoy a brush... and she told her dad that her mum plucking out her moulty fur is not only a little bit twingey but also a little demoralising. 
So she is on a diet. As a result we feed very very sorry for her... her usual routine is disrupted! At bedtime at night she is waiting by her food bowl for some delicious grains.. and they do not arrive! Only hay! Oh the disappointment of the small round basketball-with-a-head mini lop...

To alleviate her feelings of unloved-ness I have started crocheting her a round rug to sit on.... this is the beginnings...
 You can see as I have never ever crocheted anything round... it has gone a bit frilly... although it makes it better for my Suki-La who nuzzles the frillies...

This is Suki's first introduction to her rug...

You can see the excitement building as she snuggles into the center... yes. this is my rug. yes. my mum still loves me even though she is starving me. (note: on a vet prescribed diet - don't call the rspcsa - my bunny is loved and cared for:)

And then finally as you can see. The rug is loved. It is continually growing... it needs to be wide enough for a fully length stretch... then it will go into our bedroom for little Suki-La to sit on while she protects us while we sleep... you think I lie... no. She is the night watch for our pack... In the day I am watching... In the night Suki is watching:) And cold painted floorboards aren't nice for the newly slimmed bunny bottom on a long lonely night watch shift!


I have since learnt that you are supposed to add 1 extra stitch in every 4... working on it:) The rug is now nearly done:)

Friday, September 3, 2010

Bit of Friday afternoon thrifting...

I must say I am not a great thrifter.... I like to look but I don't often buy things, unless of course there is a purpose. I also don't go very often...

But today! I was on my way home and I remembered a new retro/antiques store opened about 5 minutes from my house, thought I should probably check it out!

This is what I came home with ....


Super cute right? I picked up a big piece of vintage cutey aqua spotty fabric and a vintage kokeshi doll! I wanted to start a kokeshi collection and this one just jumped out at me!:) I think she might need a little bit of love... I think her hair might need a sanding and a revarnish... and I need to find her a special new spot in my house!

Wednesday, September 1, 2010

Yay! Someone likes my things!

It is always a bit of a little thrill when you see that someone likes the things you make:)

Today my clutch was featured here on Calico and Co. blog by Amanda Fuller. These are the lovely things she featured. (Mine is the top right... hehe just saying:))

[74 Lime Lane - NSW | Bobishi - VIC]
[My Studio - VIC | Milkwood - VIC]
[Finchbird - NSW | Two Crows - VIC]
[Hannah Faerie - SA | loved - VIC]
[Kylie Ward Creation - NSW | Mecino - VIC]


Yay! Smiley Happy Days:) Thanks Amanda!

Sunday, August 29, 2010

Cutie Booties:)

I decided today that I needed to use up some of the annoying bits of fabric you end up with after making big things! So I decided to have a look in some of my pattern books to find something super cute to make with all the bits and pieces...
And I made these!
I have decided that although i do enjoy this pattern and it was very easy to make, I need to redesign it... It is not how I want it.. I think I can make it better. I am going to take it to my sisters and get her to roadtest it... And then I am going to make it better.

Pattern making here I come!! hehe


I still like them though... I added the button. The original pattern had velcro... button may be a bad idea... I have limited experience with wiggly baby feet... road test will decide:)

Saturday, August 28, 2010

New felt foods!

I really like my new camera:) And I like to make felt food... and the combination of these two things is quite exciting!
Check these out!:)


I like the tortellini... i won't lie. its super cute:)

Thursday, August 26, 2010

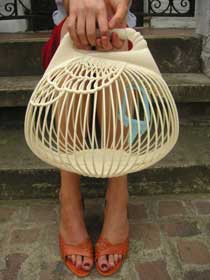
Hmmm not my style.

It's a birdcage and its a handbag... it's so you can feel close to your bird. When out and about...

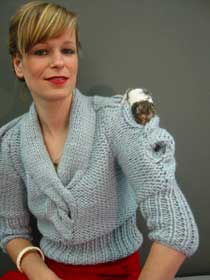
What about this one?


This lovely fashion helps you keep your small rodents closer... in your cable knits! hehe
Suki wouldn't fit. She wouldn't be impressed if i tried to encase her in the cables on my knits...

Pics from here xx.

Wednesday, August 25, 2010

YAY! New things!


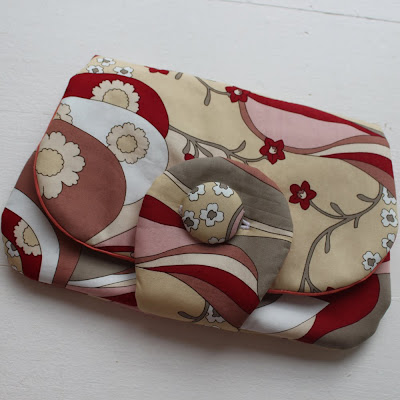
Yay! New kindle clutches! I love my kindle... I love my kindle clutch... I also love using up my fabric stash, I feel like it makes my craft room a little bit neater... hehe

All are available here at my etsy store... although you probably guessed that right?:)
Related Posts with Thumbnails