Pages

Showing posts with label tutorial. Show all posts

Sunday, February 19, 2012

Doing things... busy things...


It's school time again... we have been back at school for 2 weeks after the nice long 6 weeks off! But what a busy 6 weeks! Christmas for 17 at our new house, beach days, unpacking, preparing for the baby, doing weird things like ironing onesies (yes my secret nesting shame - i'm generally not an ironer at all!), teaching some kids sewing classes and making patterns.

This is my newest pattern, "Francis the Elephant" :) It is a super simple pattern and one of the kids classes managed to make it really well! The pattern is done, just need to finish off the instructions:)


Sunday, January 16, 2011

This weeks projects... been a busy lady!

This week has been a SUPER busy week!
I have been working hard up up to my sisters birthday because as a crazy lady I decided to make this....

(image from here)

From the So You Think You're Crafty blog tutorials, here is the linky link to part 1, from there you can get to part 2 to make your own knotty delight:)  This was the winning entry from season 5 by KoJo designs:)  Pretty awesome huh??

This one is the one I made for my sister:) As you might notice the squares are smaller, also my bed is smaller... yes that's my queen sized wearing king sized clothes...  It would look different on my sisters bed:) Also although I enjoy this colour I think I would enjoy a gunmetal grey or latte colour... I was somewhat limited by the amount of fabric on the rolls at my favourite fabric store!  So limited that there wasn't enough to make 56 large squares as instructed in the tutorial... I ended up making smaller ones... 80 smaller ones to be exact! That made it the right size:)


Here's a close up:) It was a bit time consuming, lucky my friend Chelsea helped me handsew some squares on a beach day:)  The sewing together 80 squares took me nearly 2 days and attaching it to the backing and wadding by hand took a day too... I had to deviate a bit because my new sewing machine needed some service man love and my old one couldn't love a whole king size item!


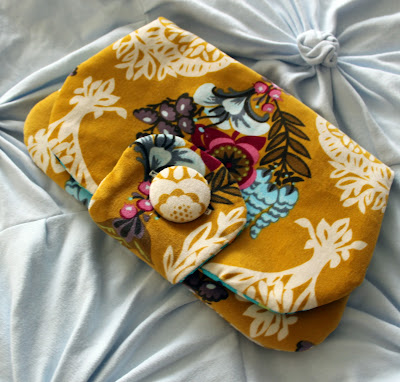
I also received a custom order for a kindle cover for my sister - but not gifted by me! Hehe:) My sister requested any fabric I thought would be good, but she did enjoy birds! Hmmm well that's a big decision... I have a good stash of fabrics! So I chose my new favourite velveteen by Anna Maria Horner from her Innocent Crush collection. It's soooo soft and nice and lovely to sew with!


So I had to add some birds on the inside:) I can't remember who made this one... but I love it!


I have to include some super cute photos of my sisters lovely babies:) We had soooo many cuddles, a trip to the park and the boy didn't spew on me today! So that was a bonus!:) 


So today we got on with making the apothecary cabinet... more pics to come for that one! I must reccommend the jersey quilt tutorial! It was so well written and quite simple! It did seem a bit weird as I was making it, but afterwards I seriously considered making my own! Unfortunately my furbaby is obsessed with smoothing and so that quilt would do her poor bunny brain in! I hope you can give it a try!

Monday, November 8, 2010

How to grow yourself a new collection:)

Sometimes things are looking a little shabby in the old succulent department... These little bubbies haven't really been well loved in sometime... sitting under the eaves with no water and a lot of sun... mistake! They have become a little misformed and somewhat crispy!
So this is the perfect occasion to do some succulent maintainence... Now I must tell you, this is the way I've been doing this for nearly 2 years, so it may not be the most effective way but it is my way...
So first you need the things above -
- Succulent and cacti potting mix (this gives the best result... although i have used normal potting mix and at one point even straight compost...)
- Somewhat overgrown succulents
-Scissors
- Seed raising tray (Not always essential I guess... but I think it helps the process a bit)
The seed raising tray below is one of mine... it is a bunnings one... my friend got similar at aldi for 1/3 of the price so if you see them there snap up a couple! I have another one but it's just not as pretty... also from bunnings..


First step is to fill the little holes with the potting mix, usually nearly all the way up to the top!


Then find some weird looking succulents that need some maintainence...

This first one is not so weird, it just has some extra babies hanging off its side... Perfect! 


This next one went weird and long... trim that back... will see what happens there... haven't ever cut the main stem off before.. usually I would take that extra little bubby one out of the middle...


This one also had long bits... and a flower coming! But the flower needs to be removed if the succulent is going to grow more successfully this season! Also I did some pruning...
  

Found this little selection on the footpath after someone tore it off a bush.


Next step is to snip off the babies and pruning bits so there is a little bit to stick in the dirt:) Luckily these ones have little roots as well.  They could have probably just have gone straight in a pot with the root system, but they are very tiny for a pot!
(At this point better homes and gardens man would have left them in the sun to form a callous on the cut so they don't rot.. but i have never done this.. not sure how much more successful it would be..)


Then just pop them in the dirt!


Then after maintaining a couple of plants you will end up with a little tray of loveliness like this:) I have two trays of lovelies right now! And in about 6 weeks they will be ready for planting in pots or you could pop them in the garden... or whatever!:)


Goodluck with your future succulent garden collection!
Related Posts with Thumbnails